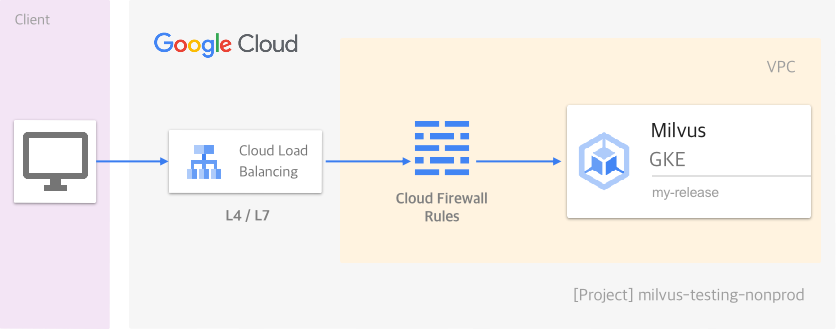
在 GKE 上部署 Milvus 集群
Milvus 是一个云原生向量数据库,可以部署在各种云环境中。本指南详细介绍了在 Google Cloud Platform (GCP) 上设置 Milvus 的每个细节。
开始之前
要在 GCP 上部署 Milvus,请确保
-
您的 GCP 账户中已经存在一个项目。
要创建项目,请参考 创建和管理项目。本指南中使用的项目名称是 milvus-testing-nonprod。
-
您已在本地安装了 gcloud CLI、kubectl 和 Helm,或决定使用基于浏览器的 Cloud Shell。
-
您已使用 GCP 账户凭据 初始化了 gcloud CLI。
设置网络
为了确保 Milvus 的安全性,您需要在 GCP 项目中创建一个逻辑隔离的虚拟网络。以下命令创建一个 VPC。
gcloud compute networks create milvus-network \
    --project=milvus-testing-nonprod \
    --subnet-mode=auto \
    --mtu=1460 \
    --bgp-routing-mode=regional
为了便于您的工作,您还需要设置几个防火墙规则,以允许通过 ICMP、RDP 和 SSH 的外部流量以及 VPC 内的流量。
gcloud compute firewall-rules create milvus-network-allow-icmp \
    --project=milvus-testing-nonprod \
    --network=projects/milvus-testing-nonprod/global/networks/milvus-network \
    --description="Allows ICMP connections from any source to any instance on the network." \
    --direction=INGRESS \
    --priority=65534 \
    --source-ranges=0.0.0.0/0 \
    --action=ALLOW \
    --rules=icmp

gcloud compute firewall-rules create milvus-network-allow-internal \
    --project=milvus-testing-nonprod \
    --network=projects/milvus-testing-nonprod/global/networks/milvus-network \
    --description="Allows connections from any source in the network IP range to any instance on the network using all protocols." \
    --direction=INGRESS \
    --priority=65534 \
    --source-ranges=10.128.0.0/9 \
    --action=ALLOW --rules=all

gcloud compute firewall-rules create milvus-network-allow-rdp \
    --project=milvus-testing-nonprod \
    --network=projects/milvus-testing-nonprod/global/networks/milvus-network \
    --description="Allows RDP connections from any source to any instance on the network using port 3389." \
    --direction=INGRESS \
    --priority=65534 \
    --source-ranges=0.0.0.0/0 \
    --action=ALLOW \
    --rules=tcp:3389

gcloud compute firewall-rules create milvus-network-allow-ssh \
    --project=milvus-testing-nonprod \
    --network=projects/milvus-testing-nonprod/global/networks/milvus-network \
    --description="Allows TCP connections from any source to any instance on the network using port 22." \
    --direction=INGRESS \
    --priority=65534 \
    --source-ranges=0.0.0.0/0 \
    --action=ALLOW \
    --rules=tcp:22
最后,您需要允许传入流量到我们稍后将创建的 Milvus 实例的端口 19530。
gcloud compute firewall-rules create allow-milvus-in \
    --project=milvus-testing-nonprod  \
    --description="Allow ingress traffic for Milvus on port 19530" \
    --direction=INGRESS \
    --priority=1000 \
    --network=projects/milvus-testing-nonprod/global/networks/milvus-network \
    --action=ALLOW \
    --rules=tcp:19530 \
    --source-ranges=0.0.0.0/0
配置 Kubernetes 集群
在本指南中,我们将使用 Google Kubernetes Engine (GKE) 服务在 us-west1-a 区域配置一个具有两个节点的 Kubernetes 集群。每个节点都是运行 COS_CONTAINERD 镜像的 e2-standard-4 Compute Engine 虚拟机。
建议您使用提供至少 16 GB 内存的机器类型以确保服务稳定性。
gcloud container clusters create "milvus-cluster-1" \
    --project "milvus-testing-nonprod" \
    --zone "us-west1-a" \
    --workload-pool "milvus-testing-nonprod.svc.id.goog" \
    --no-enable-basic-auth \
    --cluster-version "1.28.10-gke.1075001" \
    --release-channel "regular" \
    --machine-type "c2-standard-4" \
    --image-type "COS_CONTAINERD" \
    --disk-type "pd-standard" \
    --disk-size "100" \
    --max-pods-per-node "110" \
    --num-nodes "3" \
    --enable-ip-alias \
    --network "projects/milvus-testing-nonprod/global/networks/milvus-network" \
    --subnetwork "projects/milvus-testing-nonprod/regions/us-west1/subnetworks/milvus-network"
Kubernetes 集群启动需要几分钟时间。集群准备就绪后,使用以下命令获取其凭据,以便您可以在终端中运行 kubectl 命令来远程与集群通信。
gcloud container clusters get-credentials milvus-cluster-1 --zone "us-west1-a"
使用 Google Cloud Storage (GCS) 作为外部对象存储
- 创建 bucket。
gcloud storage buckets create gs://milvus-testing-nonprod --project=milvus-testing-nonprod --default-storage-class=STANDARD --location=us-west1 --uniform-bucket-level-access
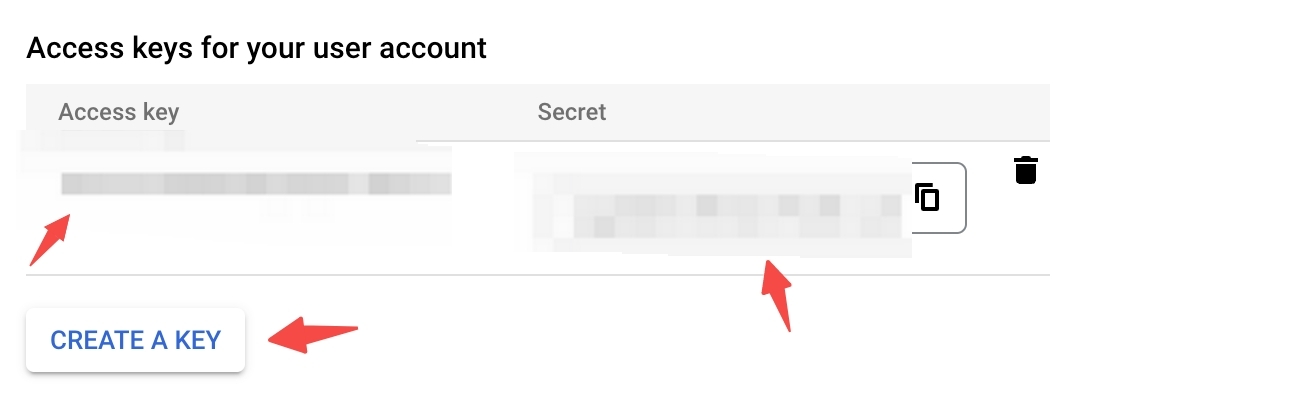
- 生成用户访问密钥和秘密密钥,您应该转到项目的存储页面。在仪表板的左侧边栏中,点击 Google Cloud Storage,然后点击设置。选择 INTEROPERABILITY 选项卡。如果您尚未启用它,请点击 Interoperable Access。然后点击 CREATE A KEY 按钮创建。
- 添加 values.yaml
cluster:
    enabled: true

service:
    type: LoadBalancer

minio:
    enabled: false

externalS3:
    enabled: true
    host: storage.googleapis.com
    port: 443
    rootPath: milvus/my-release
    bucketName: milvus-testing-nonprod
    cloudProvider: gcp
    useSSL: true
    accessKey: "<access-key>"
    secretKey: "<secret-key>"
部署 Milvus
现在 Kubernetes 集群已经准备就绪。让我们立即部署 Milvus。
helm repo add milvus https://zilliztech.github.io/milvus-helm/
helm repo update
helm install -f values.yaml my-release milvus/milvus
在上述命令中,我们在本地添加了 Milvus Helm charts 的仓库并更新仓库以获取最新的 charts。然后我们安装一个 Milvus 实例并将其命名为 my-release。
注意配置 service.type 值,它表示我们希望通过 Layer-4 负载均衡器公开 Milvus 实例。
如果您希望通过 Layer-7 负载均衡器公开您的 Milvus 实例,请阅读此文档。
验证部署
一旦所有 pod 都在运行,运行以下命令获取外部 IP 地址。
kubectl get services|grep my-release-milvus|grep LoadBalancer|awk '{print $4}'
Hello Milvus
请参考 Hello Milvus,将 host 值更改为外部 IP 地址,然后运行代码。
下一步
如果您想了解如何在其他云上部署 Milvus: